Navigation (VOR, NDB, ILS, GPS)
By installing modern scenery and modern aircraft you have also installed navigation and landing beacons and the instruments to use them. All these modern aids work in Combat Flight Simulator, though unfortunatly the manual suggests other wise and gives no help here. So this page is intended to help get you started.How navigation works
You essenially use radio becons to plot out a course, every becon has a different frequency that you can, provided you are in range tune into via your radio. Your navigation instruments will tell you the direction of beacon relative to you plane's direction. With a little forward planning you can decided on a succesion of beacons tune to to get to your final destination (Flight Plan) then use a landing beacon to bring your aircraft down safely, even in poor visibility.Becons and Flight Plan
These are the type radio beacons you can tune into
- ILS (Instrument Landing System) - instrument landing beacon
- VOR (Very High Frequency Omni-directional Range) - navigation beacon
- NDB (Non-directional Radio Beacon)- navigation beacon used with ADF (Automatic Direction Finder)
- ATIS (Automated Terminal Information System) - this should give weather and airport information, I don't know if this works in CFS
To enable the beacons you must first edit [Combat Flight Simulator Directory]\Combatfs.cfgand setADF_TRACK=1When you installed scenery you should have also had text files describing the type, frequency, range and position of beacons available. Though this is not always the case and some scenerys expect you to install an extra scenery layer of navigational aids for the area.
Even with all information provided plotting out a flight plan with just text files is hard work. So I strongly recommend one of the many freeware flight planning software tools available. These will ask for the directory of your installed scenerys and use this to create a map of the beacons available and detailed information about each. Usually you have a clickable zoomable map with the beacons as symbols. You can determine distances between beacons and draw out a flight plan. You also have information on the length and direction of runways to help plan landings.
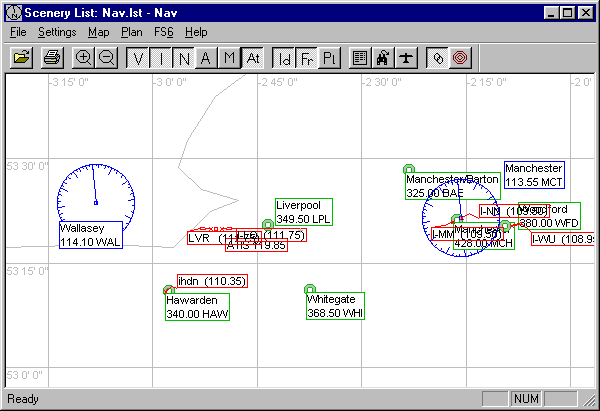
I use NAV by Fred Wright (shown below)
Radio
On your radio you normally have five frequencies that you set by moving the mouse over the respective frequency dials. The cursor should change to a hand with either + or - indicated. Hence clicking the mouse changes frequency.- COM - set to ATIS frequency (control tower)
- NAV1 -set to ILS frequency
- NAV2 -set to VOR frequency
- ADF - set to NDB (or ADF) frequency
- Transponder - not important
R.M.I.
The Radio Magnetic Indicator has is dial with two arrows, one pointing to VOR the other to NDB selected. When an arrow is pointing to 12 oclock position you are heading towards that beacon. If not in range of transmitter the respective arrow will point to 3oclock. VORs usually have a range of ~50 - 100NM, NDBs ~30NM. (NM - Nautical Miles). Note VORs are line of sight dependant hence higher altitudes give greater range.
Note for smaller commercial aircraft (Cessnas, Pipers, etc) you may have separate guages for VORs and NDBs called NAV1 and ADF.
When in range the NAV1 guage will show a line, a from-to arrow, a cirular surround with bearings from 0 to 360 degrees and an OBS selector button. By clicking on the OBS selector you move to circular surround. When this surround's 12 oclock position corresponds to the correct heading for the VOR the line will move to the centre vertical position and the from-to arrow will point up. Some VORs give distance information, if you have a DME (Distance Measurement Equipment) device you can tune this to the VOR frequency to get a distance to VOR measurement.
H.S.I.
The Horizontal Situation Indicator works in conjuction with the ILS (Instrument Landing System) beacon selected. It won't work unless in range of this short range (~25NM) transmitter. It provides a representaion of the runway that your heading must line up with. There will also be a G.S. (glide slope) indicator that represents your required angle of approach. Auto Pilot
Aswell as using beacons for navigation you can set headings, altittude and speed with an auto pilot. To fly in a desired direction at a desired speed and altittude you activate buttons... - [AP] - master switch
- [HDG] - the heading you want your plane to fly in
- [ALT] - altittude to fly at
- [SP] - speed
You have clickable dials to set your heading, altittude and speed.
You can also set Course, this is the final approach heading for the runway you have chosen to land on. Also you can set the auto pilot to head towards a navigation beacon.
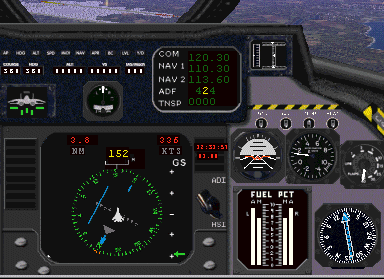
The image below shows HSI (bottom left), RMI (bottom right), Auto Pilot (top left) and Radio (top middle) for F14 Tomcat.
For a more detailed tutorial on using navigational instruments try David French's Navigation Tutorial for FS98.
GPS
Modern aircraft have Global Positioning Systems that use satellites to indicate an aircraft's current logittude and lattitude to 10 meters accuracy. Pilots of smaller aircraft can buy cheap little hand held GPS devices that do the same and provide a LCD map display of current position relative to airports and waypoints. Some GPS systems tie into the auto pilot letting you set the longittude and lattitude of a desired destination. With CFS you already have a GPS display of sorts with slew mode and map mode, though there are freeware guages and devices that add a more realistic interface to this info.
Typically GPS guages are added to
[Combat Flight Simulator Home]\guages
and referenced from within an imported aircrafts panel.cfg file.
You may need to paste in extra text into this panel.cfg file, example text is usually provided in the GPS devices's installation instructions.
Also you may need to copy a DLL (dynamic link library) file to [Combat Flight Simulator Home].
Here's an excellent FS98 site listing GPS addons
FS98 GPS at Flight Simulator 98
Problems
If you find that you aircraft panel is not clickable, you may be because your imported aircraft's panel.cfg is using render_3d_window. Instead of using this try settingPANEL_MASKING_OFF=0in
[Combat Flight Simulator Directory]\Combatfs.cfgDon't touch any aircraft that already come with CFS!!!
With some aircraft I find that setting the radio can be a problem if figures are to small, try a different aircraft or panel.
For some frequencies dial increments are too large, any help most welcome.